Thursday, November 22, 2012

What a difference a year makes


Thanksgiving 2011
Baby Henry ~ 6 weeks old

Thanksgiving 2012

13 months old


Sunday, November 18, 2012

Autumn falling, babies growing

Henry & Charlotte were reunited this weekend for a romp in a familiar field.  Many moons ago, we took our little babies to the field, spread a pink blanket and took some pictures of them wiggling on their backs and examining each other's toes.  I'm not sure they were even rolling much then.
Valentine's Day shoot, 4 and 5 months old


Then in April, we gave our babies some eggs to play with and Charlotte showed off her ability to sit for several seconds without toppling over.

Easter shoot, 6 and 7 months

Check them out now- running and talking!  Charlotte repeated "pine cone" when her mom said it, and Henry went right up to Charlotte and said "baby," whilst patting her head.  There might've been a few squabbles over the football, but these two had a grand 'ol time running down the hill and riding in the wagon.

Thanksgiving week, 13 and 14 months


Why is this pinecone so small?


An eyes-closed hug is a very special one indeed


Happy girl!


If you have it, it's mine.  If I have it, it's mine. If I want it, it's mine.  I think we've figured out toddler brains.


Charlotte and her great mom


Babies frozen solid watching the moms throw leaves


Tuesday, August 21, 2012

First Day of the 12-13 schoolyear

So I've been seeing these cute composite pictures on Pinterest- a picture of your child on the first day of school and one on the last day to see just how much they change in a year.  Obviously Henry's not really in "school" yet, but he does attend a high school for daycare, so why not?  I finally got a picture of him holding the construction paper sign:

...but not before a serious amount of takes
Don't mind the bed head


And were I a totally "together" mom, I would have anticipated this photoshoot by getting a super trendy chalkboard and decorated it with my very best lettering skills, but this was 6:30 am the day of, so I'm lucky I even knew which direction to hold the camera.

Miss you, little cub

Wednesday, August 8, 2012

Craft #2 for Henryland

Since I've been running Camp Henry this summer, I haven't found much time for blogging.  Even now, I had to pick a topic that will take me five minutes or less to post on, because although Henry is banging on pots in the kitchen, he will undoubtedly get bored with that in a few minutes and go looking for trouble.  
*          *          *
A couple months ago, I decided to work on procuring a table for Henryland that would eventually become a little art table- or maybe even a place for an afternoon snack.  After feigning surprise at how much little wooden tables cost online (I should know by now)- it dawned on me- we HAVE a little wooden table that we haven't put to good use.  This was an end table, purchased in the college years during the IKEA obsession, that was neglected for a couple seasons on an outdoor patio and collected a nice layer of mildew.  I was tempted to just get rid of it, but it turns out a little bit of mildew is easily removed with a sander (thanks, Dad!)

It looked much better sanded, but it still needed a little paint to elevate it from belongs-by-the-roadside status.  We have almost a full gallon of white paint leftover from our move-in, and so I breathed some new life into it with just a few brush strokes.
To make it a little more appealing to a baby's eye, I decided to paint a big graphic beagle on it (we don't know too much about Henry's tastes yet, but we know he LOVES his beagles!)  I had a beagle stencil leftover from a craft in the nursery and just needed to figure out a way to get it on a large scale.  My mom had this awesome 70's episcope for projecting small objects to a larger scale... buuuuuuuuut it didn't work.  I guess the shelf life of an episcope is 40 years- not 42.

 So I had to freehand it.  As you can see, my beagle has a bit of a robust chest- but that's okay, so does my real life beagle.  I also happened to have red and yellow acrylic paints in the garage (if you know me, that's not a surprise)
 After I made him orange, I have him a little red piping in the spirit of Henryland colors- and here's how he turned out:

 
Our little cub seems pretty excited about the final result:
 And these picture were taken almost two full months ago, so he looks so young to me here.  The main difference is the amount of hair he has- he's getting more each day!
So let's review what we have so far:
Large area gate and extension panel: $155.42
Foam mats (plus many extras for replacements): $107.82
DIY light fixture: $29
End table I already had $0 + paint I already had $0 + stencil I already had $0 + acrylics I already had $0: $0
Running total: $292.24
Leaving $307.76 for the rest of the furniture, accessories and wall hangings.
Will I come in under budget or will I be sleeping on the couch?
Stay tuned to find out!

Friday, June 15, 2012

Eight months and on the move!

 Henry boy is 8 months old

Here's an it's-10:30-pm-and-I'm-incredibly-tired-update:
He started army crawling at 6 months, pulled up to stand about a month later, and has progressed to a hands and knees crawl that is fast.  He and the dogs often move around the house as a pack.  Of course Lady is moving toward him and Sawyer is moving away from him (in terror), but two of the three are having a grand old time.  One night, we heard Henry wake up and whimper, so Drew went into the nursery, only to find Lady sitting right next to Henry's crib, doing everything her doggie self could to help him.  

And speaking of dogs, I have trained Henry to kiss me just like our old pall Pavlov and that incredibly disgusting word: salivation.  Ok, ignore the gross word and focus on the kissing.  It's not a pucker kiss yet, but he places his open mouth against my cheek (and sometimes other people's) and clearly knows that it's a gesture that pleases people.  The other day, when I hugged him goodbye in the morning, he planted one sweet Henry kiss on my cheek and the timing swept my little heart away.  I thought about it all day at work. 

One tough thing about this stage is that Henry no longer drifts off gently to sleep; in fact, he fights sleep.  He gets tired, I guess overtired, and arches his back in a ferocious backbend that would make any 9-year-old gymnast proud as he wails like a banshee.  We have to be careful about bathing him too late, because once he was overtired in the tub, and started doing his archy flailing.  Trying to hold on to a soaped-up little boy, thrashing with all his might is like trying to hold on to a slippery fish with vaselined hands.  Anyway, it scared me because he bonked his head on the tub in the process, and I've decided bath time has to come much earlier. We haven't had another incident like that one since- phew.

But accompanying the difficult tired tantrums is one fun little boy.  We've started to notice that his grin is a bit mischevous (which everyone, including Andrew, asserts that it comes from me- I have no counterargument).  He roars with laughter when Daddy lifts him high in the air and he barks at the dogs. 

And in other news, he's getting hair!  It seemed to happen overnight. And he has a line of curls that goes down the center of his head, and some curls forming at his neck.

Still no teeth.  After one week (in month five or so) of showing unmistakable teething signs... nothing.  His mouth wasn't bothering him anymore and the drooling stopped.  He'll be walking before he gets his first tooth.

Ok, I'm tired. Onto the pics.  Check out the failed attempts to get his picture because he kept crawling off the mat to eat the dirt. And hey- I found a use for one of the five 3' balloons I have leftover from the craft.  


But I got one I was happy with:

 Love you, cheeky little baby.

Wednesday, May 23, 2012

Craft # 1 for Henry's play yard

I know it's wrong to break my blogging silence with a blog post not giving Henry updates, but it's Henry-related.
Because he's crawling all over the place (see, I did give a Henry update) we have decided to turn an unused corner of our living room into a play yard for Henry.  The working title is Henryland, but we're still wordsmithing it, considering that we should probably be teaching him that the universe does not, in fact, revolve around him.  But Henryland seems to roll off the tongue nicely, so until something better presents itself, that is the name.
Andrew put me on a strict $500 budget for the entirety of the project, which will have to cover the large area gate, baby foam flooring, furniture, any wall hangings/decorations and a light fixture.  Considering the gate and floor ate up over half of the budget, I'm going to have to find crafty ways to get everything done for that price (although Momma Mitchell did send me a birthday check for $100 that said for Henryland on it, so I suppose it has been stretched to $600 against Andrew's will).

So my first craft was creating a "whirl it" lamp to light the dark corner.  I originally saw it here but I seemed to run into more problems than they did over at Pickles (see "mistakes" section below), and as you can see, mine came out a tad lumpy on the bottom, but that's the thing about DIY crafts as opposed to manufactured items... they'll be imperfect.

Cost of craft:

Yarn: $3
Wallpaper glue: $12 (or $4 if your not a numbskull and don't overestimate the amount of glue needed and buy the small instead of the medium)
Light bulb hanging kit with on/off switch: $10 after tax and shipping from Amazon
Gigantic 3' balloon $2 plus $2 for inflation: $4
Various supplies you probably already have around the house: sharpie, vaseline, rubber gloves, scissors
A little of your dignity if you have to beg your mom to help you with craft
So my total was $29, but like I said, had I not overestimated the glue, this craft would have cost $21 (plus defamation of character, of course), 
Materials

So, if you decide to try to make something like this, please learn from my mistakes.  Mistake #1 This is a two-person craft.  I repeat: a two-person craft.  If you go at it alone, you will find it painstakingly slow to do both the motion of puling the yarn through the glue (and untangling knots) and whirling the balloon.  My first attempt was on Mother's Day after brunch with my family and son, and was conceived as a nice little afternoon treat for me to get outside and work on a craft I've been wanting to do.  (Insert image of me making loud nooises of frustration and exasperation on our back patio as I wrestled knot after knot out of the glue). Mistake #2 Do not use a beach ball instead of a balloon.  It sounds like a great idea because they are only $1 at the dollar store, but they won't have the same forceful pop that seperates the surface of the balloon from the gluey string.  Rather, it will slowly deflate, along with your enthusiasm for the project.
So attempt 1 went in the trash and my resolve to conquer this craft was strengthened.  I rounded up a big balloon and coerced my mother into the gig and found much more success.  Now, I will say, even though, it worked the second time, we did end up with some lumps on just the bottom part and nowhere else.  This could be because we wrapped our balloon in two sessions instead of all at once (Henry protested about 45 minutes into the craft), which gave the balloon time to lose helium.  Or possibly, some glue ran down the top and side strands and collected at the bottom, making it heavier and soggier, which buckled in the drying process.  So since I'm not entirely sure it could have been avoided, well call it Mistake #2.5- Carve out a solid two-hour chunk of time and do it all at once.
*          *          *
Here is the process in a nutshell (Steps 8 & 9 are optional)
1. Hang balloon.
2. Cover balloon with vaseline.
3. Draw a circle around one end that will be a yarn-free zone (for lightbulb).
4. While one person wraps, have the other feed the yarn through the glue and untangle knots.
5. Hang the balloon indoors to dry for at least 24 hours.
6. Pop the balloon and fish it out of the shell.
7. Use the same color yard to hang the ball, suspended around the lightbulb.
8. Step back and breathe a sigh of relief that you didn't let the craft conquer you a second time.
9. Spend precious essay-grading time blogging about the woes and triumphs of craft.

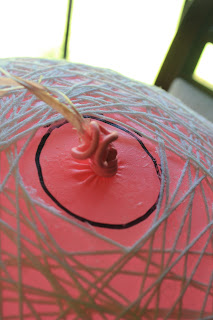
Just make sure you draw a circle big enough for the bulb and hanging fixture to fit in when it's all done.

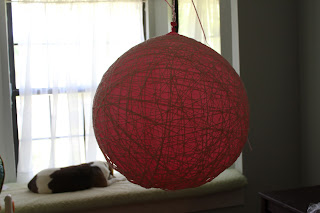
Lady could care less that a giant, goopy orb has found its way into our breakfast nook.

Post-popping.  Before it was hung, Henry was really fascinated by the pattern and crawled over to it to touch it.
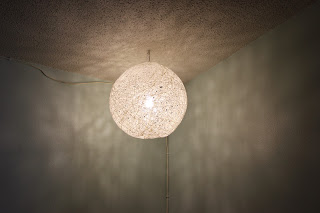
The spiderwebby shadows cast a magical glow, dontchya think?
Craft #2...coming soon-soonish.  Tomorrow is our wedding anniversary and then there's a birthday and baptism to celebrate this weekend, so who knows when it will be done.  But I'll share my (mis)adventures with that one, too.

Sunday, March 4, 2012

Baptism for baby, baptism for mama

In the last 8 days, Henry and I were both baptized-one in the Baptist Church and one in the Presbyterian Church. Let me explain. Andrew, Henry and I regularly attend the Baptist Church within walking distance from our house, but in order to become members, I needed to be baptized by immersion because this denomination does not recognize the infant baptism I received with my Presbyterian upbringing. Because Andrew had already been baptized by immersion, he got to stay dry. Here are two pictures from my baptism last week:

And although I plan on continuing to attend the Baptist Church with my family, I still treasure the aforementioned tradition of infant baptism and wanted to have Henry baptized. My parents' church out in Havana has been so wonderful in welcoming Henry into a community of Christ and today was no exception. It was hard to get a good picture of Henry in his little linen suspenders suit because he was squirming so much (I might dress him in it again and get some pictures because it was pretty darn cute).


It was so cute- just as Reverend Bess turned to Henry to tell him about Jesus' love for him, Henry had just spotted a little kid in the front row and was smiling away. It was perfectly timed :)


One set of proud grandparents look on (the other set were just as proud, and there in spirit)


Henry did really well during the actual baptism. He almost let out a wail during the thrd dip, but maintained.


Although you can tell he wasn't quite as happy with a wet head


So I got really excited to make Henry his first cake and sort of bit off more than I could chew. I decided to take on a large fondant cake and, late last night, was really sorry I did! I made three cakes- two for the double layers- and a third so I could cut a cross out of it. Then I made my own buttercream frosting (that part actually turned out pretty well). And then I started the beast they call fondant and although I was able to get it off the rolling pin and onto the cake, it was not as smooth as fondant should be and I didn't end up getting to make the colors I wanted for the cake, so I just did two tones of pale green. I wanted to do some sort of piping or decoration around the bottom of the cake but I was simply too tired from a long day of baking (I had to make a second trip to the store... who knew fondant required eight cups of powdered sugar?!) and Henry-wrangling (it was a tough day for me and Drew in terms of Henry; he was so fussy that we thought he had an ear infection or something) and I still had to iron his little baptism outfit and take a shower. Pre-Henry, I probably would not have rested until the project was completed to my satisfaction, but I'm glad that this little newcomer has helped me learn to embrace my imperfection.


Andrew later pointed out the irony in my using devil's food cake for a baptism cake.


And here's our little windblown family in front of the biggest tree trunk you've ever seen.