I know it's wrong to break my blogging silence with a blog post not giving Henry updates, but it's Henry-related.
Because he's crawling all over the place (see, I did give a Henry update) we have decided to turn an unused corner of our living room into a play yard for Henry. The working title is Henryland, but we're still wordsmithing it, considering that we should probably be teaching him that the universe does not, in fact, revolve around him. But Henryland seems to roll off the tongue nicely, so until something better presents itself, that is the name.
Andrew put me on a strict $500 budget for the entirety of the project, which will have to cover the large area gate, baby foam flooring, furniture, any wall hangings/decorations and a light fixture. Considering the gate and floor ate up over half of the budget, I'm going to have to find crafty ways to get everything done for that price (although Momma Mitchell did send me a birthday check for $100 that said for Henryland on it, so I suppose it has been stretched to $600 against Andrew's will).
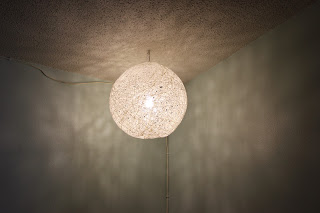
So my first craft was creating a "whirl it" lamp to light the dark corner. I originally saw it here but I seemed to run into more problems than they did over at Pickles (see "mistakes" section below), and as you can see, mine came out a tad lumpy on the bottom, but that's the thing about DIY crafts as opposed to manufactured items... they'll be imperfect.
Cost of craft:
Yarn: $3
Wallpaper glue: $12 (or $4 if your not a numbskull and don't overestimate the amount of glue needed and buy the small instead of the medium)
Light bulb hanging kit with on/off switch: $10 after tax and shipping from Amazon
Gigantic 3' balloon $2 plus $2 for inflation: $4
Various supplies you probably already have around the house: sharpie, vaseline, rubber gloves, scissors
A little of your dignity if you have to beg your mom to help you with craft
So my total was $29, but like I said, had I not overestimated the glue, this craft would have cost $21 (plus defamation of character, of course),
 |
| Materials |
So, if you decide to try to make something like this, please learn from my mistakes. Mistake #1 This is a two-person craft. I repeat: a two-person craft. If you go at it alone, you will find it painstakingly slow to do both the motion of puling the yarn through the glue (and untangling knots) and whirling the balloon. My first attempt was on Mother's Day after brunch with my family and son, and was conceived as a nice little afternoon treat for me to get outside and work on a craft I've been wanting to do. (Insert image of me making loud nooises of frustration and exasperation on our back patio as I wrestled knot after knot out of the glue). Mistake #2 Do not use a beach ball instead of a balloon. It sounds like a great idea because they are only $1 at the dollar store, but they won't have the same forceful pop that seperates the surface of the balloon from the gluey string. Rather, it will slowly deflate, along with your enthusiasm for the project.
So attempt 1 went in the trash and my resolve to conquer this craft was strengthened. I rounded up a big balloon and coerced my mother into the gig and found much more success. Now, I will say, even though, it worked the second time, we did end up with some lumps on just the bottom part and nowhere else. This could be because we wrapped our balloon in two sessions instead of all at once (Henry protested about 45 minutes into the craft), which gave the balloon time to lose helium. Or possibly, some glue ran down the top and side strands and collected at the bottom, making it heavier and soggier, which buckled in the drying process. So since I'm not entirely sure it could have been avoided, well call it Mistake #2.5- Carve out a solid two-hour chunk of time and do it all at once.
* * *
Here is the process in a nutshell (Steps 8 & 9 are optional)
1. Hang balloon.
2. Cover balloon with vaseline.
3. Draw a circle around one end that will be a yarn-free zone (for lightbulb).
4. While one person wraps, have the other feed the yarn through the glue and untangle knots.
5. Hang the balloon indoors to dry for at least 24 hours.
6. Pop the balloon and fish it out of the shell.
7. Use the same color yard to hang the ball, suspended around the lightbulb.
8. Step back and breathe a sigh of relief that you didn't let the craft conquer you a second time.
9. Spend precious essay-grading time blogging about the woes and triumphs of craft.
 |
| Just make sure you draw a circle big enough for the bulb and hanging fixture to fit in when it's all done. |
 |
| Post-popping. Before it was hung, Henry was really fascinated by the pattern and crawled over to it to touch it. |
 |
| The spiderwebby shadows cast a magical glow, dontchya think? |


